
Pasteurizing raw milk that will be consumed by those who are sensitive to foodborne illnesses is very critical. Pregnant women, young children, older adults, and people suffering from cancer, HIV/AIDS, and other immune system illnesses are all included. Spare yourself the risks and buy pasteurized milk or learn how to pasteurize milk at home.

Pasteurized milk has an outstanding food safety record and constitutes a dietary source of several essential elements. Learn more about the risks and benefits of raw and pasteurized milk.
If you’re not convinced why you should consume pasteurized milk, read this article: Raw Vs. Pasteurized Milk: Risks and Benefits
What is pasteurization?
Pasteurization is a method of killing germs (mostly bacteria) in food and beverages such as milk, juice, canned food, and others. During the 19th century, French scientist Louis Pasteur created it. The procedure accomplishes this by eradicating pathogenic bacteria and reducing microbial numbers.

This method is now commonly employed in the dairy industry and other food processing industries to preserve food and ensure food safety. Unlike sterilization, pasteurization is not designed to eliminate all germs in the food. Instead, it seeks to minimize the quantity of viable microorganisms to the point that they are unlikely to cause disease. The pasteurized product should be stored properly and consumed before its expiration date.
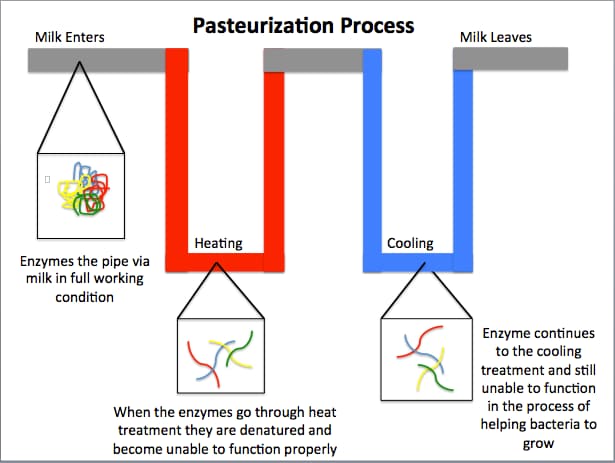
The picture above depicts a high-level overview of the Pasteurization process. The milk begins on the left and enters the pipe with active enzymes, which get denatured when heated and cease to function. This inhibits pathogen growth by preventing cell functioning. The cooling method helps to prevent Maillard Reaction and Caramelization in the milk. The Pasteurization process can also heat the cells to the point where they explode due to pressure buildup.
How do I pasteurize milk at home?
What do I need?
Instructions
- Clean and sterilize
– Clean your hands and your workspace.
– First, wash the thermometer in hot, soapy water, then rinse. Sterilize the thermometer ideally by rubbing it with a single-use alcohol swab or bleach and then rinsing it again.
– Sanitize and clean containers. Before using a milk container, thoroughly clean it with hot water and soap. After cleaning, sterilize a heat-safe container by immersing it in hot water; at least 170F (77C) for 30 to 60 seconds.
– Allow the container to dry naturally. Bacteria can be reintroduced by using a cotton towel. - Heat the milk.
– Fill the bottom half of the double boiler halfway with water.
– Preheat the double boiler to medium-high heat.
– Stir often to help the temperature equalize and prevent scorching.
– Increase the heat a little at a time to carefully heat the milk.
– Check the temperature of the milk with a kitchen thermometer.
– Check that the thermometer probe is not touching the sides or bottom of the pot, or the measurement will be inaccurate.
– Stir frequently as the milk heats up. - Maintain the milk at the proper temperature.
– Keep a watchful eye on the temperature.
– Heat the milk for at least 30 minutes at 150°F (63°C) or for at least 15 seconds at 162°F (72°C).
– If the temperature falls below the one you’re using, you must restart the time.
– As the milk hits the above-mentioned temperature, swirl regularly and remove the milk. - Cool the milk.
– Place the top of the double boiler in an ice water bath to quickly cool it. Do not get water in the milk.
– Stir the milk frequently to help it chill faster until it hits 68°F (20°C) or below.
– The quicker you cool your pasteurized milk, the safer and tastier it will be.
– Place it in the ice bath and swirl frequently to help the heat escape.
– Replace some of the heated water with cold water or ice after a few minutes.
– Repeat as often as the water warms — the more frequently, the better.
– The milk is ready when it reaches 40°F (4.4°C).
– Pour the milk into the containers immediately and label them with the date.
Note: You can use an ice cream machine in this step.
How should I store pasteurized milk?
Keep the container well closed and away from light.
Pasteurization destroys only 90 to 99% of the germs in milk. To keep the bacteria population from expanding to dangerous levels, keep the milk refrigerated.
How long can I store the pasteurized milk in the fridge?
Pasteurized milk will normally last about 10 days in the fridge. If the milk is stored above 45oF (7oC), if fresh contamination is added (for example, by touching it with a filthy spoon), or if the raw milk was not handled adequately before pasteurization, it will spoil faster.
Are there any special pasteurization tools?
Consider purchasing a specialist milk pasteurizing machine if you have your animals and pasteurize a lot of milk. A machine can pasteurize larger batches of milk and may perform a better job of retaining the flavor of the milk.
“Batch” or LTLT (low-temperature long time) machines are the most affordable and straightforward, however, HTST (high-temperature short time) machines are faster and have less of an impact on taste.
The milk must still cool quickly for the pasteurization to operate. If your machine does not include this step, remember to transfer the milk to a cold water bath. You can use an ice cream machine for this step.
Sign Up for Our Email List
Get our latest articles, healthy recipes, tips, and exclusive deals delivered straight to your inbox with our newsletter.
We won't send you spam. Unsubscribe at any time.